VATSIM Connect for IPB

Prerequisites
You should have access to https://auth.vatsim.net. If you're haven't created an organization yet, proceed and create one. You will need an approved organization to be able to create new OAuth2 clients. Read more about how to create your organization here:
Create a backup
Make sure you have a fresh backup of your IPB installation files and also a database backup before you proceed further!
Download plugin
Download IPBoard Plugin repository to your host from https://github.com/vatsimnetwork/connect-ipboard. It contains two files VATSIMSSOv2.php and VatsimMember.php. You need to place them both in <IPBoard installation path>/system/Login directory.
Apply changes to the database
Run the following MySQL commands to add this login handler to your installation, add a vatsim_cid field to the members table and then add some needed entries to your languages table (English only). Make sure that you edit the queries to match your IPBoard prefix if it isn't default.
INSERT INTO `core_login_methods` (`login_classname`, `login_settings`, `login_order`, `login_acp`, `login_enabled`, `login_register`) VALUES ('IPS\Login\VATSIMSSOv2', '{"client_id":null,"client_secret":null,"scope":null,"sso_requirements_url":null, "base_url":null}', '4', '1', '0', '0');

ALTER TABLE `core_members` ADD `vatsim_cid` INT(7) UNSIGNED NULL AFTER `member_id`;

INSERT INTO `core_sys_lang_words` (`word_id`, `lang_id`, `word_app`, `word_key`, `word_default`, `word_custom`, `word_default_version`, `word_custom_version`, `word_js`, `word_export`, `word_plugin`, `word_theme`) VALUES (NULL, '1', 'core', 'login_handler_Vatsim', 'VATSIM SSO Login', NULL, '100031', NULL, '0', '1', NULL, NULL);
INSERT INTO `core_sys_lang_words` (`word_id`, `lang_id`, `word_app`, `word_key`, `word_default`, `word_custom`, `word_default_version`, `word_custom_version`, `word_js`, `word_export`, `word_plugin`, `word_theme`) VALUES (NULL, '1', 'core', 'login_vatsim_base_url', 'Forum Base URL', NULL, '100031', NULL, '0', '1', NULL, NULL);
INSERT INTO `core_sys_lang_words` (`word_id`, `lang_id`, `word_app`, `word_key`, `word_default`, `word_custom`, `word_default_version`, `word_custom_version`, `word_js`, `word_export`, `word_plugin`, `word_theme`) VALUES (NULL, '1', 'core', 'login_vatsim_client_id', 'VATSIM Auth Client ID', NULL, '100031', NULL, '0', '1', NULL, NULL);
INSERT INTO `core_sys_lang_words` (`word_id`, `lang_id`, `word_app`, `word_key`, `word_default`, `word_custom`, `word_default_version`, `word_custom_version`, `word_js`, `word_export`, `word_plugin`, `word_theme`) VALUES (NULL, '1', 'core', 'login_vatsim_client_secret', 'VATSIM Auth Client Secret', NULL, '100031', NULL, '0', '1', NULL, NULL);
INSERT INTO `core_sys_lang_words` (`word_id`, `lang_id`, `word_app`, `word_key`, `word_default`, `word_custom`, `word_default_version`, `word_custom_version`, `word_js`, `word_export`, `word_plugin`, `word_theme`) VALUES (NULL, '1', 'core', 'login_vatsim_sso_requirements_url', 'VATSIM Auth Requirements URL', NULL, '100031', NULL, '0', '1', NULL, NULL);
INSERT INTO `core_sys_lang_words` (`word_id`, `lang_id`, `word_app`, `word_key`, `word_default`, `word_custom`, `word_default_version`, `word_custom_version`, `word_js`, `word_export`, `word_plugin`, `word_theme`) VALUES (NULL, '1', 'core', 'login_vatsim_scope', 'VATSIM Auth Scope', NULL, '100031', NULL, '0', '1', NULL, NULL);
Configure OAuth2 client
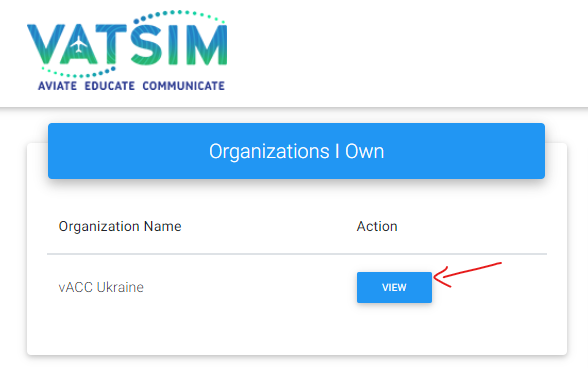
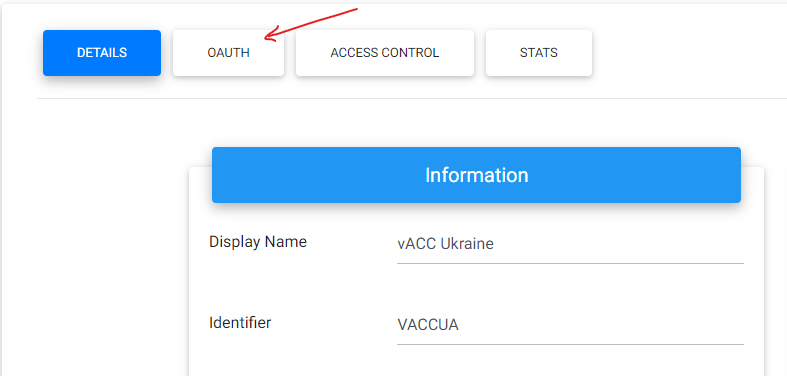
Proceed to the https://auth.vatsim.net and click on VIEW button opposite to the organization name, then click on OAUTH button.
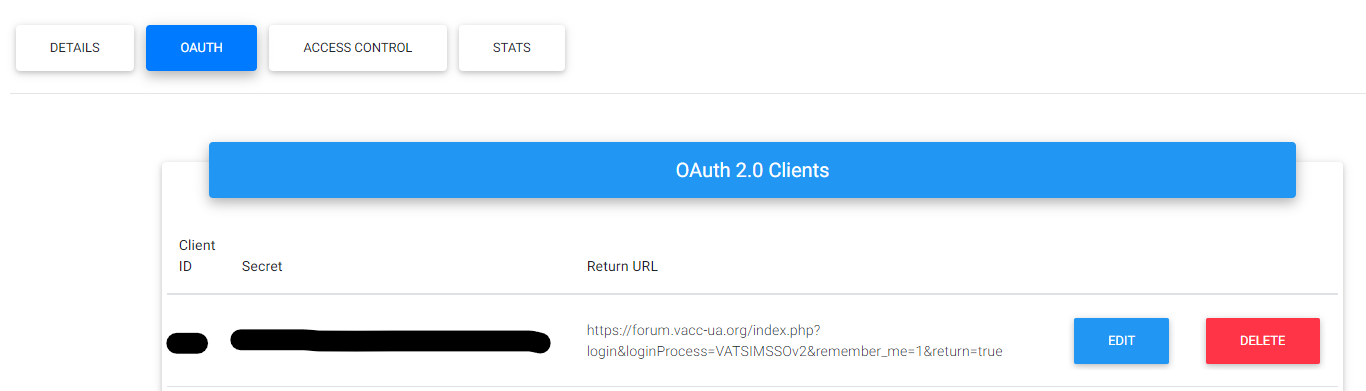
In the OAuth 2.0 Clients section click on a NEW SITE button at the bottom. You will be redirected to the new SSO Site form. Fill Redirect URL field, replacing <FORUM_URL> with your actual URL:
https://<FORUM_URL>/index.php?login&loginProcess=VATSIMSSOv2&remember_me=1&return=true
Then press SUBMIT. You will see that a new client is added to the table. This line contains Client ID and Secret fields that will be required on the next step.
Setup login handler in IPB
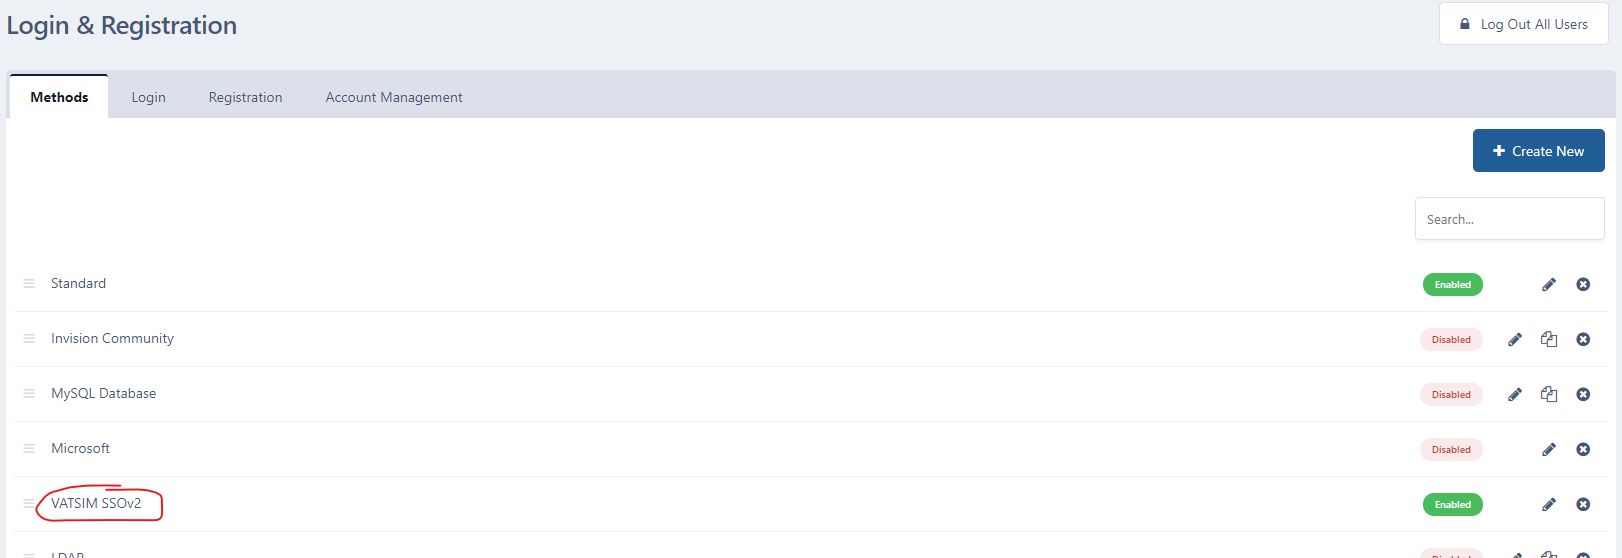
Login to your Admin Control Panel, visit System > Settings > Login & Registration. You should see a VATSIM SSO Login handler.
Click on a pencil icon on the right to continue to handler editing dialog. Fill all required fields (marked with *):
- Name - you can change the default name of VATSIM SSO Login to whatever you want
- Allow Admin CP logins? - I would recommend to left this unselected
- When a user signs in for the first time - Set to Create an account
- Forum Base URL - fill with your forum base URL, like
https://forum.vacc-ua.org - VATSIM Auth Client ID - enter ID you created on the previous step
- VATSIM Auth Client Secret - enter Secret you created on the previous step
- VATSIM Auth Requirements URL - this is some kind of mystic field, it's not documented anywhere, so I just put there a
https://forums.vatsim.net/vatsim-connect-error/as I saw somewhere on a forum - VATSIM Auth Scope - set to
full_name vatsim_details email
Your form should look like that:
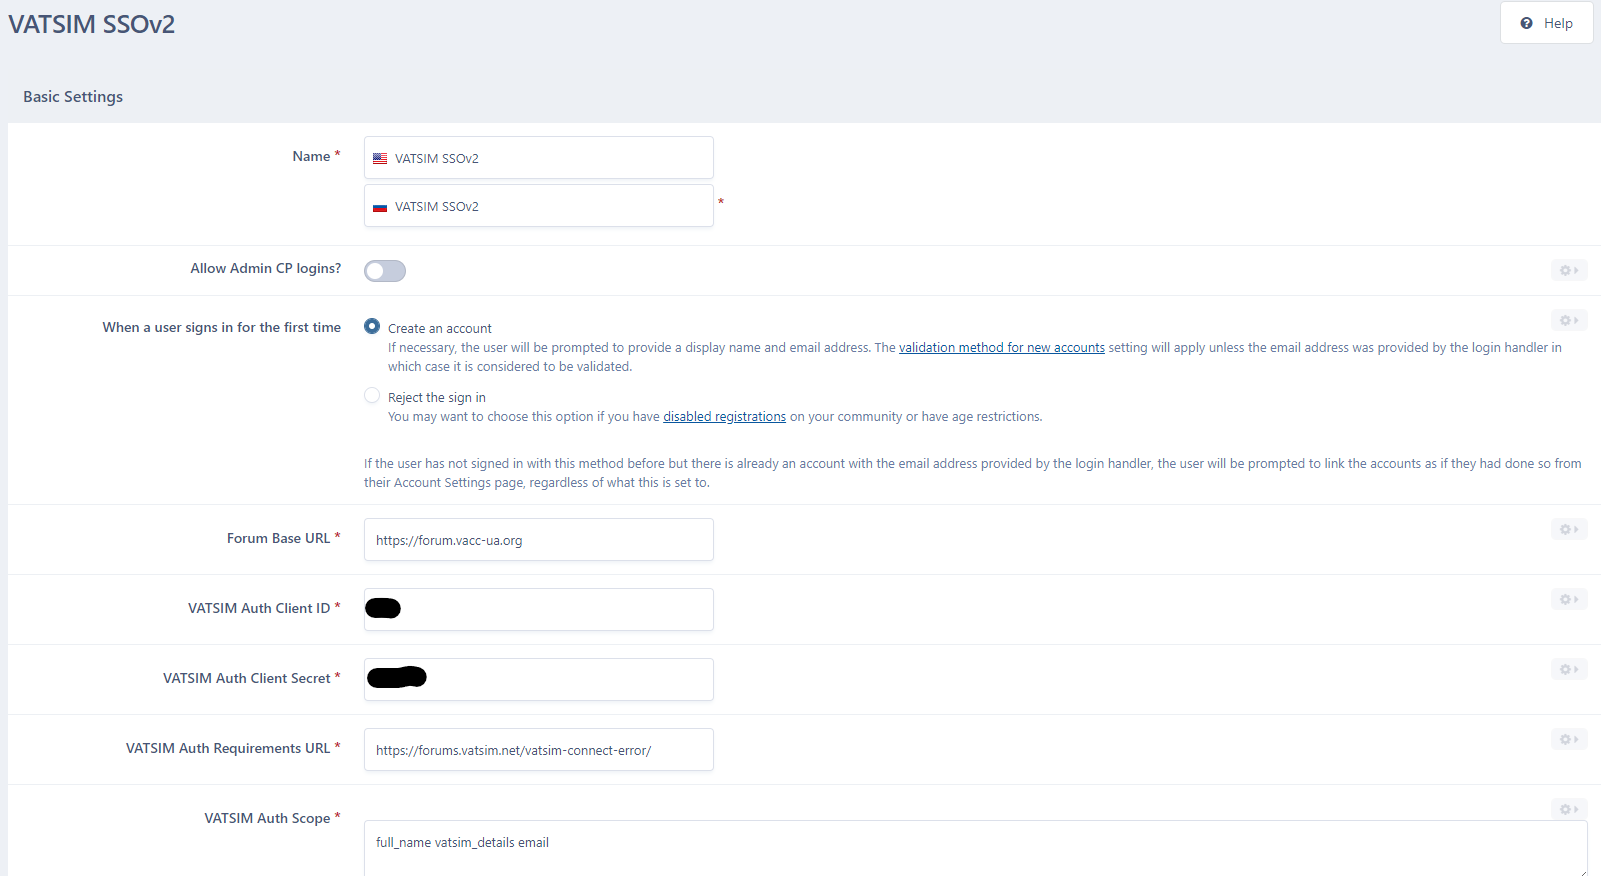
Finally click on the Save button at the bottom.
Changing templates (for IPB 4.2 and earlier)
NOTICE: As gists that are referenced in the original repo are vanished, I don't have the exact contents of the required changes to the templates. All the code provided here is taken from my forum cached templates. To have the ability to roll the changes, make a copy of your theme before you begin. In case if the changes break anything in your login forms, rollback to default or switch to the backup.
The final step is to modify your forum templates so that the VATSIM ID is displayed under the members' avatar in each post, and also to edit your login form.
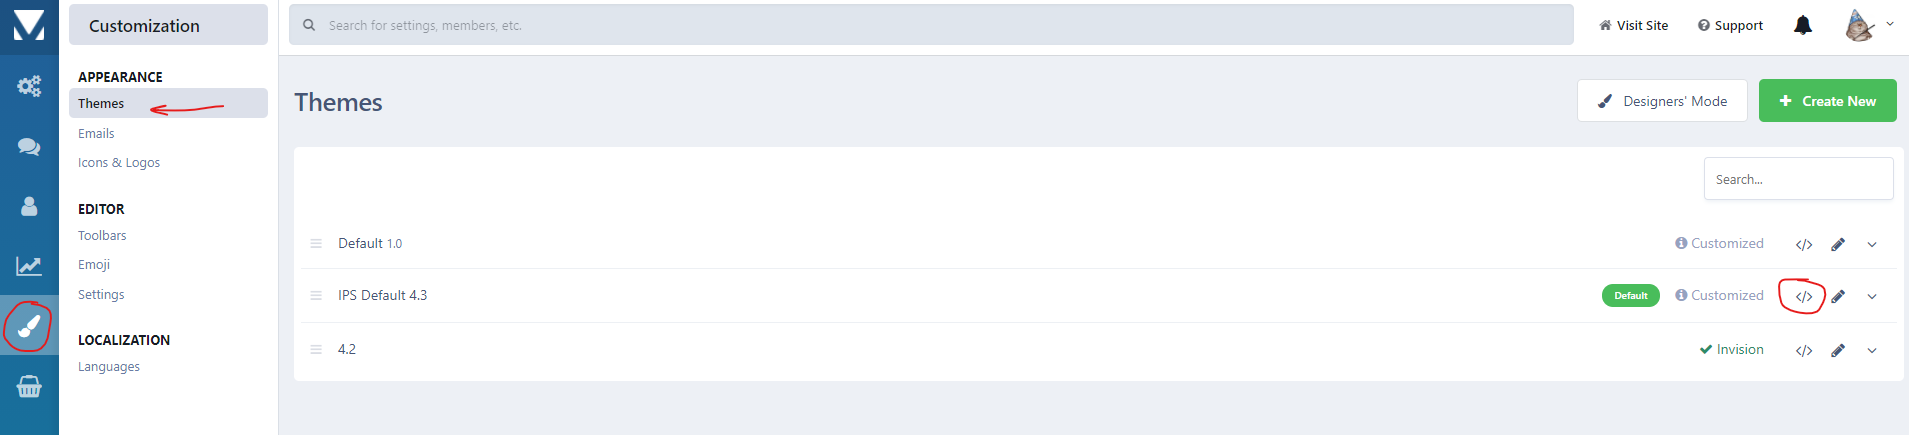
Visit Customization > Themes and click Edit HTML and CSS for a theme that you're using. You should make the changes to every theme that is enabled on a forum.
Use the search field or browse on the left tree to the core > front > global and locate the loginPopup file. Replace file contents with:
<div id='elUserSignIn_menu' class='ipsMenu ipsMenu_auto ipsHide'>
	<form accept-charset='utf-8' method='post' action='{$login->url}' data-controller="core.global.core.login">
		<input type="hidden" name="csrfKey" value="{expression="\IPS\Session::i()->csrfKey"}">
		<input type="hidden" name="ref" value="{expression="base64_encode( \IPS\Request::i()->url() )"}">
		<div data-role="loginForm">
			{{$usernamePasswordMethods = $login->usernamePasswordMethods();}}
			{{$buttonMethods = $login->buttonMethods();}}
			{{if $usernamePasswordMethods and $buttonMethods}}
				<div class='ipsColumns ipsColumns_noSpacing'>
					<div class='ipsColumn ipsColumn_wide' id='elUserSignIn_internal'>
						{template="loginPopupForm" app="core" group="global" params="$login"}
					</div>
					<div class='ipsColumn ipsColumn_wide'>
						<div class='ipsPadding' id='elUserSignIn_external'>
							<div class='ipsAreaBackground_light ipsPadding:half'>
								{{if \count( $buttonMethods ) > 1}}
									<p class='ipsType_reset ipsType_small ipsType_center'><strong>{lang="sign_in_with_these"}</strong></p>
								{{endif}}
								{{foreach $buttonMethods as $method}}
									<div class='ipsType_center ipsMargin_top:half'>
										{$method->button()|raw}
									</div>
								{{endforeach}}
							</div>
						</div>
					</div>
				</div>
			{{elseif $usernamePasswordMethods}}
				{template="loginPopupForm" app="core" group="global" params="$login"}
			{{elseif $buttonMethods}}
				<div class="cLogin_popupSingle">
					{{foreach $buttonMethods as $method}}
						<div class='ipsPadding:half ipsType_center'>
							{$method->button()|raw}
						</div>
					{{endforeach}}
				</div>
			{{endif}}
		</div>
	</form>
</div>
Then go to core > front > system and find the login file. Replace file contents with:
{{if !\IPS\Request::i()->isAjax()}}
	<div class=''>
		<br>
		<h1 class='ipsType_reset ipsType_veryLarge ipsType_center'>{lang='sign_in_short'}</h1>
		{{if \IPS\Settings::i()->allow_reg}}
			<p class='ipsType_large ipsType_center ipsType_light'>{lang="dont_have_an_account"} <a href='{url="app=core&module=system&controller=register" seoTemplate="register"}'>{lang="sign_up"}</a>.</p>
		{{endif}}
		<br>
{{endif}}

	<div class='ipsColumns ipsColumns_collapsePhone'>
		<!--<div class='ipsColumn ipsColumn_fluid ipsBox'>
			<div class='ipsPad'>
				{{if $error !== NULL}}
					{template="message" group="global" location="global" params="$error, 'error'"}
					<br>
				{{endif}}
				{{foreach $forms as $k => $form}}
					{{if $k === '_standard'}}
						{$form|raw}
					{{endif}}
				{{endforeach}}
			</div>
		</div>
		{{if count ( $forms ) > 1}}
			<div class='ipsColumn ipsColumn_veryWide ipsBox'>
				<div class='ipsPad'>
					<h2 class='ipsType_sectionHead'>{lang='sign_in_faster'}</h2>
					{{if count ( $forms ) > 2}}
						<p class='ipsType_normal ipsType_reset ipsType_light'>{lang='sign_in_connect'}</p>
					{{endif}}
					<br>
					{{foreach $forms as $k => $form}}
						{{if $k !== '_standard'}}
							<div class='ipsPad_half'>{$form|raw}</div>
						{{endif}}
					{{endforeach}}
				</div>
			</div>
		{{endif}}-->
      <div class='ipsColumn ipsColumn_fluid ipsBox'>
			<div class='ipsPad' style='text-align: center;'>
				{{if count ( $forms ) > 2}}
						<p class='ipsType_normal ipsType_reset ipsType_light'>{lang='sign_in_connect'}</p>
					{{endif}}
					<br>
					{{foreach $forms as $k => $form}}
						{{if $k !== '_standard'}}
							<div class='ipsPad_half'>{$form|raw}</div>
						{{endif}}
					{{endforeach}}
			</div>
		</div>
	</div>

{{if !\IPS\Request::i()->isAjax()}}
</div>
{{endif}}
Finally go to core > front > global and find the customFieldsDisplay file. Insert next line inside {{foreach...}} ... {{endforeach}} block:
<li class='ipsResponsive_hidePhone ipsType_break'>VATSIM ID: {$author->vatsim_cid}</li>Save templates.
Registration settings (for IPB 4.3+)
Head to the System > Login & Registration > Registration in Admin CP. To disallow new registrations using any of the login methods (except for VATSIM SSO), switch Allow new registration? to No.
In this case, users will not be allowed to register new accounts, but if they're will log in via VATSIM SSO, a new account will be created automatically if needed.

Member discussion